Tuesday, October 30, 2012

Zesty Cheeseburger Soup

Ingredients: 1# hamburger Diced onion
1 tbsp flour
1/4 cup sour cream
4oz. processed cheese (such as Velveeta)
2 cups (16 fl. oz) beef broth (although I almost used chicken... so sue me)
Mushrooms!!!
3 tbsp tomato paste
1 tbsp Dijon Mustard
2 tbsp Worcestershire sauce
salt & pepper to taste

additional toppings: bacon tomatoes pickles or anything else you may eat on a cheeseburger.

1.  Dice your Onion

2.  Brown (sweat) your onion until it is caramelized.

3.  Add in your hamburger and brown.  Salt & pepper.

4.  Add in 1 tbsp flour (this is your thickening agent)

5.  Next add in your 3 tbsp of tomato paste.  Make sure you move them around to "wake" it up.

6.  And a tbsp or one big squirt of Dijon mustard.  We found Jack Daniels Dijon Mustard... mmmm :)

7.  Then add in the 1/4 cup sour cream.

8.  Mix well.  Then add your Mushrooms and let them cook a bit.  (now if you are using fresh, I used canned this time, add them back when you are sweating your onions so they get cooked)

9.  Next add in your beef broth.

Now you can stop here and you have a nice Hamburger Soup... but we were making what again??

10.  Cheeseburger soup.  That requires: Cheese :)  Add in your cheese and break it up so that it melts quickly. b/c we all know by this time we're HUNGRY! :)

11.  Dish it up

12.  Here is where you'd add your toppings.  We chose some TexMex tomatoes we found in the canned goods aisle.  Mmmm!
Enjoy!  I sure did!!

Monday, October 29, 2012

CHEESEY CHICKEN TATER TOTS

EASY CROCKPOT RECIPE!! LOVE IT!
What you need:
32 ounce bag tater tots
4 diced strips of bacon (precooked)
4 boneless skinless chicken breasts
3 cups Colby jack cheese
3/4 cup milk salt and pepper

What to do:

1 Spray crock pot with cooking spray
2 Layer 1/2 the tater tots on the bottom of the pot.
3 Sprinkle with 1/4 of bacon bits.
 4 Sprinkle 1/3 of the cheese over the bacon and tots.
5 Top cheese with the chicken breasts.
6 Sprinkle chicken with salt and pepper to taste.
7 Top chicken with another 1/3 of cheese.
8 Sprinkle with another 1/4 of bacon bits.
9 Add remainder of the tater tots.
10 Top with final 1/3 of the cheese.
11 Pour milk over the top.
12 Set crock pot to high and cook 3-4 hours

Friday, October 26, 2012

Calzones

I really enjoy having calzones as a change of pace from pizza once in awhile. I don't have to try to figure out how much of each pizza to put what toppings on, as everyone comes to the counter to fill his or her own. This isn't so much of a recipe, as I do typically buy pizza dough, but for a very long time I was hesitant to try making calzones and thought maybe some photos and instructions could boost someone else's confidence too.

I cooked the sausage first, and then added some onions and pepper to the pan. After a few minutes I put some sliced mushrooms off in a corner by themselves and also threw in a handful of frozen spinach (also quarantined with the mushrooms).
The dough at our grocery store comes in 28 ounce balls. I leave the dough on the counter for a few hours before I am ready to start preparing. I cut one ball into four hunks. Each hunk of dough gets rolled out to maybe 1/2". I don't use oil or flour, just a dough roller that is like a mini rolling pin. If you haven't ever rolled out pizza dough, it takes some effort and muscle, in my opinion. It's kind of like you have to "break" the elasticity, before it stops pulling back to a blob. As you can see, the shape is not important, as long as some sort of half can be found. You can also see that I like everything that was in the pan! I put mozzarella cheese down first, followed by small scoops of ricotta cheese. This one was rolled out on the back of a cutting board, but two others were rolled out right on the pizza stone.
After your fillings are inside, you pull the dough over and seal it. I really squeeze the edges together, and sort of squish (highbrow cooking term there) them until the original seam isn't as visible, so they don't burst in the oven. Cut a few holes in the top for venting.
Bake them in a preheated 425 oven for about 18 minutes. They will start to brown and the dough will feel crusty, and "thud" when you knock on it.
Hungry? I know a lot of people put tomato sauce in their calzones before they close them up, but I haven't tried that (mainly because it is not what I grew accustomed to). We serve our sauce on the side for dipping. I admit that we used sauce from a jar this night. I have a general rule that if I put effort into what the sauce is going on (stuffed shells is another example), then I might not make a pot of sauce.
I hope you'll try these, and have fun with the toppings! This is just a sampling of what we had. Some of our other favorites are pepperoni (no kidding) and meatballs.

Tuesday, October 23, 2012

King Arthur Flour Banana Bread

A couple weekends ago when I woke up I went into the kitchen and I realized that I had some bananas that were going to go bad.   I thought, let's use these bananas before they go bad. Tbug is with us again that weekend so I asked her if she'd like to help.  She jumped on it. 
This is the cookbook we used.  

Here is snapshot of the recipe we followed.

We didn't have any buttermilk, sour cream or yogurt, but never fear... if you don't have buttermilk, you can always make your own... a cup of milk to a tbsp of vinegar.

Beat in the eggs with the sugar & Vegetable Oil.

Mash up a cup of Ripe bananas.  (2-3 bananas) Add to the mixture and then add vanilla and mix.

Then I taught Tbug how to measure out flour.

Once you add the flour, baking soda, baking powder, cinnamon & nutmeg to the sifter, then you sift it.
Then you mix in the flour.  Once it is all mixed, then add your buttermilk.  Just mix until it is mixed (haha smart huh).  Next you need to grease and flour (we forgot to flour) your loaf pan.

Then put it in the oven and bake it off.  The recipe said at 40 minutes if the edges start getting to dark before it's completely baked, then you can put a foil tent.  I should have put the tent on at 30 minutes.  The outsides got a little darker than the insides, but it came out great after baking an hour.  The house smells WONDERFUL!!  We can't wait to cut in to it.

Hope you enjoyed our second cooking lesson :)

Monday, October 22, 2012

Fajita Marinade

This is a SUPER YUMMY Mexican Marinade for flank steak, or sirloin. But then you can use the meat for quesadillas, burritos, street tacos, chimichangas or fajitas…

What you need:

2 - 7 oz cans of Chipotle Peppers
½ bundle of cilantro
Juice from 2-3 Limes
¼ cup oil

Combine the above 3 ingredients in a blender until smooth and creamy. Then dump the sauce into a large ziplock bag and place the meat in there to soak. After about an hour, you can grill the meat. (Megan, YES, you need a grill for this one. You don’t know what you are missing!!)

I usually dice the meat up and put it in a container in the fridge to be reheated for quesadillas or tacos.


Totally YUMMO – AND – EASY!!

Friday, October 19, 2012

Dark Chocolate Chocolate Chip Cookies

Happy National Cookie Month...for real, it is!

My name is Andrea, and I love cookies! I admit that most of the time I stick to one of my half dozen or so tried and true recipes, but just a bit of cocoa can add a little pizazz to your favorite chocolate chip cookie.


Dark Chocolate Chocolate Chip Cookies

2 sticks of margarine (I know, I know, some folks are butter purists, but I like a cakey cookie. Sometimes I do play around and use a combination of butter and margarine, or all butter.)

3/4 cup brown sugar (firmly packed)
3/4 cup sugar

1 tsp vanilla
2 eggs
2 1/2 cups flour
1/3 cup Hershey Special Dark unsweetened cocoa (or any cocoa powder)
1 tsp baking soda
1/2 tsp salt
2 cups of Nestle semi-sweet chocolate chips (sometimes I get fancy and use dark or other brands, but these are really my favorite)

Cream the margarine/butter and sugar until it is mixed well. (I still don't know what fluffy means in this instance.) Add the vanilla and eggs. Mix some more. (I would be lost without my stand mixer.) Add the dry ingredients, and mix some more. Then stir in the chocolate chips.

Decide what size cookie you want, and roll the dough into balls. Bake cookies that are 1 tablespoon in size for about 11 minutes at 375. Adjust time accordingly for bigger cookies. Let stand on cookie sheet for a few minutes then move to wire rack to cool. Pour yourself a glass of milk, and enjoy!

I like to always put a few in the refrigerator to heat up at a later time, since warm cookies are the best!


Monday, October 15, 2012

Butterscotch Pumpkin Bars

It's that time of year again....
Time for some FALL BAKING and ALL THINGS PUMPKIN!
I first made these bars last year.
to.die.for.

Ingredients:
•1 (18 1/4-ounce) package yellow cake mix
•1 egg
•8 tablespoons butter, melted
•1 (8-ounce) package cream cheese, softened
•1 (15-ounce) can pumpkin
•3 eggs
•1 teaspoon vanilla paste
•8 tablespoons unsalted butter, melted
•2 cups powdered sugar
•2 teaspoons pumpkin pie spice
•1 cup butterscotch chips


Directions:
1.Preheat oven to 350 degrees F.


2.Combine the cake mix, egg, and butter and mix well with an electric mixer. Smoosh the mixture into the bottom of a lightly greased 13 by 9-inch baking pan.
3.To make the filling: In a large bowl, beat the cream cheese and pumpkin until smooth. Add the eggs, vanilla, and butter, and beat together. Next, add the powdered sugar, pumpkin pie spice and butterscotch chips. Mix well. Spread pumpkin mixture over cake batter and bake for 40 to 50 minutes. Make sure not to over bake as the center should be a little mushy.
4.Serve with fresh whipped cream.


Tuesday, October 9, 2012

Kitty Litter Cake


Need a yummy Halloween treat???? 


Sometimes I have  to make it a little more realistic...However, melt some of the tootsie rolls TOO much and it makes a runny mess....


I love watching half the office picking up "turds" and eating them... then watching the other half gag... I know, I am wierd!

If you want to make the cake:
What you need:

1 chocolate cake mix

1 white cake mix

2 packages instant vanilla pudding mix

1 ( package vanilla sandwich cookies

blue or green food coloring

1 package tootsie rolls

Then you:


1.Prepare cake mixes and bake according to package directions (any size pan).


2.Prepare pudding according to package directions and chill until ready to assemble.


3.Crumble sandwich cookies in small batches in a food processor, scraping often. Set aside all but 1/4 cup.

To the 1/4 cup add a few drops of green food coloring and mix.


4.When cakes are cooled to room temperature, crumble them into a large bowl. Toss with 1/2 of the remaining cookie crumbs, and the chilled pudding. You probably won't need all of the pudding, you want the cake to be just moist, not soggy.


5.Line kitty litter box with the kitty litter liner. Put cake mixture into box.


6.Put half of the unwrapped tootsie rolls in a microwave safe dish and heat until softened. Shape the ends so that they are no longer blunt, and curve the tootsie rolls slightly. Bury tootsie rolls randomly in the cake and sprinkle with half of the remaining cookie crumbs. Sprinkle a small amount of the green colored cookie crumbs lightly over the top.


7.Heat 3 or 4 of the tootsie rolls in the microwave until almost melted. Scrape them on top of the cake and sprinkle lightly with some of the green cookie crumbs. Heat the remaining tootsie rolls until pliable and shape as before. Spread all but one randomly over top of cake mixture. Sprinkle with any remaining cookie crumbs. Hang the remaining tootsie roll over side of litter box and sprinkle with a few green cookie crumbs. Serve with the pooper scooper for a gross Halloween dessert.

Tuesday, October 2, 2012

Chicken Piccata

So Jill sent me a recipe for chicken a long time ago... Well when PC and I went to the store the other night, I couldn't remember everything that was in the chicken recipe but told him we needed to try it.  So one day this week I emailed Jill to see what all went into the recipe.  Dang, I didn't have everything at the house... and last night I was way to lazy to go to the store, so I ran across a different recipe for Chicken Piccata Pasta.  I did a quick search (more so in my head at work yesterday) of the ingredients in the dish vs what we had at the house...

Chicken (1 1/2 lbs).... Check
Olive Oil (2tbsp).... Extra Virgin, check
Lemon Pepper Rub(1 1/2 tbsp).... My husband is the spice king, I think so, check
Chicken Broth (3 cans or 6 cups).... Check
Onion (1/2 medium).... Check
Pasta (12 oz).... check
 Lemon (1)... Nope but shhh we'll pretend I didn't see that one
Cream Cheese (2 oz).... Check
Artichoke Hearts (1 can).... nope, but oh well who needs those, right?
Capers (1/4 cup).... Nope, maybe next time :)
Parsley & Parmesan cheese (garnish)... both optional but I think we have both.

So if you notice, we didn't have the lemon, artichoke hearts and capers.  PC didn't want the artichoke hearts, and it wasn't worth it to stop at the store for lemon and capers... so I'll just wing it :) 
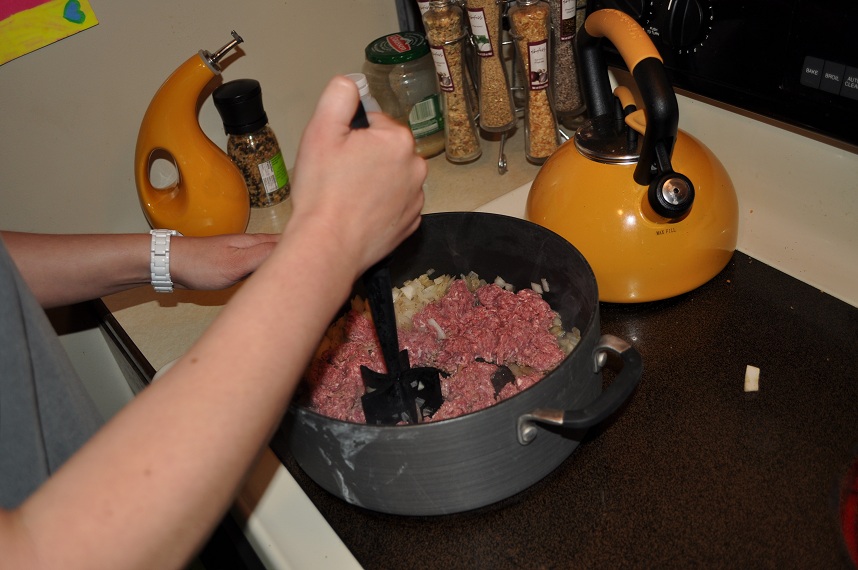
So I went into the kitchen and washed the chicken... don't know why, it's something my mom always did and so that's what I do... blame it on the up-bringing!

Step 1: Now cut the chicken into bite size pieces.  I can do that! Combine chicken, 1 tbsp of oil and rub in mixing bowl, toss to coat.... Crap missed that step... ok so I'll just season the chicken up in the pan... After digging through the entire spice cabinet and referring to our spice list... I realized NO Lemon Pepper... Crap crap crap.... Dang it that was in my mom's spice cabinet... ok now what... oh at the bottom it said
Cook's Tip: to substitute lemon pepper rub in step 1, toss chicken with 1 tsp salt and course ground black pepper. Ok so I salted it and put a ton of black pepper on it.  Then went digging through the cabinet and found Garlic Pepper seasoning... hmmm we'll try that too, why not?

Once the chicken was cooked.... OMG it was to die for!!!  Score for me!

I had my cooking partner in the kitchen with me.  Most times she was sacked out on the floor but every time I went to take her picture she woke up...

Ever since she was a puppy she's laid in the kitchen with us while we're cooking.  She's going to be a great Dog Chef one of these days... she knows all the ins and outs ;)

Step 2: Pour broth in a Large microwave bowl, covered and microwave on high 8-10 minutes or until boiling. Dice up the onion and add onion to a skillet, cook 10-20 minutes (oh no wait seconds... don't make that mistake... no I didn't I just typed it wrong and left it :)) or until the onion is fragrant.  Carefully pour broth and add pasta; cook uncovered for 7-8 minutes or until tender, stir occasionally. Oh heck why dirty up a second bowl... the broth can come to a boil in the skillet :)  When I added the onion I added some garlic too... heck why not warn off the vampires tonight! So I went to put the broth in the skillet... dang it's not a big enough pan... I put in 5 of the 6 cups... eh, it works :)

Crud I added the pasta before I brought the broth to a boil... that's probably why they say to microwave it to a boil.... oh well... patience Nicole! Patience.

Step 3: Zest lemon to measure 1 tbsp zest.  Juice lemon to measure 2 tbsp.  Add zest, juice and cream cheese to skillt; stir until cream cheese is fully incorporated.  Add chicken, artichokes to skillet.  Cook covered 1-2 mins or until heated through.  Remove from heat and add capers.  Garnish with parsley & Parmesan cheese. No lemon so no zest or juice... oh well... moving on.  Add cream cheese... yum!  That right there made it to die for!  Add chicken and artichokes... no artichokes so I say forget covering it to heat!  No capers either and we completely forgot about the parsley & Parmesan cheese. We snacked on this the whole process of making it.  It was delicious!

Then I almost forgot to take a photo of the finished product.  In fact this is after PC and I both had our helpings.
Very seldom do I deviate from a recipe the first time like this... I at least make it once so I know what it's supposed to taste like then I start making changes.  Last night I didn't have much choice and boy am I glad I did it my way.  I now wonder what it tastes like with all the lemon... I may have to remake this.  And I've never actually tried a caper... I just might have to invest :) This is averaged at $2/serving... that's not bad!  It came from a Pampered Chef cookbook I recently purchased!  I'm sold!!!  But that $2 is if you follow specific directions...  I'll bet mine was cheaper...

Monday, October 1, 2012

Warm Crab Dip

Warm Crab Dip


What you need:


2 (8 oz) Cream Cheese, softened

4 T Miracle Whip

2 Cups shredded Colby/Jack Cheese

16 oz crab meat

1 1/2 T fresh lemon juice

2 cloves minced garlic

2 T Worcestershire sauce

paprika, for garnish

1 T Old Bay seasoning

1/4 cup chives


The easy three steps:


--Preheat oven to 350 degrees F (175 degrees C).

--In a medium bowl, mix the cream cheese, mayonnaise, shredded cheese, crab meat, old bay, lemon juice, garlic, chives and Worcestershire sauce. Transfer to a shallow 9x9 inch baking dish (sprayed with non-stick spray). Garnish with paprika.

--Bake in the preheated oven 30 minutes, or until golden brown and bubbly.